Pages

Wednesday, October 24, 2012

Introducing Isaac Wynn!

 Isaac joined us the night before last, at 8:43 pm on October 22.  He was 9 lb 5 oz and 20", just a little less all around than his big brother two years and some months ago.
 His birth story is much briefer that Alten's, which lasted a couple of days between when Margo's work began and when he came out.  Isaac gave us shorter notice - labor lasted less than 3 1/2 hours!  Margo gave me a call while I was finishing up work at 5:15 and I hustled home.  She was in touch with the midwife, to whom we reported progress with some regularity.
Labor moved pretty fast in the end, though, and our midwife's capable assistant (who lives much closer than our midwife) got here about 20 minutes before Isaac.  Whew!  With some encouragement I caught him on his way out, and that was a great experience.  A half-hour later our midwife arrived and helped out with the rest of the documentation.  We are grateful beyond words for the experience and confidence that they brought to both of our home-birth experiences...
Thanks to the many who have shared their congratulations with us in the past day or so!  We strongly feel your love; know that it has been received, and that it may be awhile before we talk again :)

Names are, of course, a fun and funny thing.  As many others before us have, we made lists and lists out of books and books and books.  We compared our lists and crossed out names, we devised first name lists and middle name lists, then lists of combinations.  As a general direction we looked for names that meant "joy".  Those who know, know that Isaac means "laughter" or "he laughs" in Hebrew, and that's what we chose from our short list after spending a few waking hours with our new boy.  Alten chose Isaac's second name (from a very short list) and most liked Wynn, which means "cheerful" and "fair" in its Old Welsh roots, and "friend" in Old English.  We count that as a good sign!


At left, Alten is meeting Isaac for the first time.  For the first ten minutes or so he enjoyed touching Isaac and kissing his head.  After that he commenced bouncing around the house, and hasn't really stopped yet.


And here Daddy and Alten are holding the new boy.


Finally, this morning Mama and Isaac watched Alten sort out Mama's vitamins for the day.


More to come!
16964


Wednesday, August 29, 2012

The Other Liquid Gold

It's our first year keeping bees, so everything is new, every event is a mystery, and every new stage catches me by surprise.

I had gone over to Steve's last week to hand him back the starter frame of honey he gave me, the one he put in to help the swarm with sustenance before they started serious foraging.  (It took four months for them to stop putting brood in it.)  I also wanted to ask him when he thought he'd be pulling his honey supers off this year.

When I arrived he was in full swing doing just that; a maelstrom of bees whirled in his immediate vicinity as the glove-less master plied his trade.  He'd pull out a frame, give it a good shake or two to get most of the bees off, brush the others away, and put the frame in an empty super beside him.  When the super was full of capped honey frames he would carry it over to his wagon, which had about ten such supers on it when Alten and I showed up. 

"Hey Steve!  How many times have you been stung?"
"Just three.  OUCH!  Four."

He was heading out of town for the weekend, but expected to be ready to extract later on this week, so I told him I'd get my supers over to him toward the beginning of the week.  That way everything would be prepared ahead of time.

Yesterday I went out to pull our own honey frames using the same system, with a few changes: I used gloves, instead of a brush I cleared the bees with a feather, and Mom helped me out by applying the smoke and taking the bee-free frames over to the wagon.  It was great!  You spend the whole year trying to keep the bees calm and chill, and then, once a year, you throw them into flurry with relatively little regard.  My favorite part, I think, was figuring out how to most effectively give the frame a shake to get the bees off.  That and daintily dusting the frames with a feather, which made me feel somehow quite Elizabethan.

Our Kenyan interns, Esther and Asbeta, were shocked at the way the bees behaved. "You would not try such a thing in Kenya, oh no.  We could not even stand so close.  We would all be stung horribly."  Their bees are, of course, not simply africanized honey bees, but entirely african, and extremely aggressive.  You harvest very late in the day, with a lot of smoke.  Their bees are so volatile that colonies are frequently put on the path to one's house, so that if thieves approach your compound in the night they will be driven away by the stings, and possibly severely injured.  In that light, I can see that our bees are docile as chickens.

I parked the wagon with our two supers in the garage with plans that Alten and I could take them over in the afternoon.  Soon after I came in the house the phone rang, and it was Steve.

  "Hey Steve!  Guess what I just finished doing.  Taking off my honey supers!"
  "Oh, good! Bring them on over - I'm getting ready to start extracting just now."

This required a significant rearrangement of our afternoon's schedule, but within a reasonable amount of time the supers were loaded in the car and I was on my way to Steve's, with no idea what to expect.  I somehow thought we'd be extracting in the cool, dark basement, because that's where I'd seen his equipment, but I was nearly as wrong as possible.  He was all set up in his greenhouse with all its doors, windows, and vents closed.  It was somewhere between 106° and 110° F.  If you want the honey to flow, some heat really helps.
 
  We did my frames first, pulling them out, scraping all the caps off with a fork, and slipping them in each tray of the extractor (photo at right).  His will do two medium supers or four shallow supers at a time, which is part of why he uses shallows now.  Ours are medium, so it goes a bit slower.  We spun them once for one side of the frame, flipped them around and spun, then flipped them around one last time and spun the first side again. It was surprising to me to feel how much lighter they were without the honey.

I had weighed the two supers with their frames full of honey before starting, and after extracting I weighed them again.  This was the only way to find out how much honey was mine, since a good bit of it was also stuck to the sides and the bottom of the extractor when we started on Steve's frames.  We could then top off what was in the bucket till it reached the proper weight.

I had intended to help Steve with his extracting - all 20 supers- but Margo called to let me know the interns needed to go home.  That wasn't a disappointment to Steve, though.  He was very pleased to see me go from interest to questions to getting equipment, then receiving a swarm, and finally to harvesting honey and extracting.  He says so many people say they want to keep bees, but precious few that he knows actually take the leap.  That is all the reward he needs, and it seems to be quite a reward.  I'm lucky to have such a support.

So are you curious about how much we got?  Though it would have been great simply to have a healthy colony by fall, this was a good year.  Our swarm went from absolutely nothing but foundation in May to having fully drawn comb in two brood boxes and most of two medium supers, and even generating some honey on top of that.  We ended up with 47 and a half pounds of honey!  And we are very grateful.
 15530

Thursday, July 19, 2012

A Few Updates

What's new, besides the unbridled heat and incredible drought we're experiencing?  Well, besides a thorough report on our current weather "issues", I want to take a moment to fill readers in on the three projects I've posted most recently: the Triangle, the bees, and the yurt.
You may recall from the March post that we're trying to rehabilitate a little section of a commercially farmed field by the garden.  As the record will clearly show, we have not been blessed with regular rain. As result our already confused spring planting of winter wheat has only grown to about six inches high before browning and dying.  I really can't blame it.  The Canadian field peas were troopers, though, and came to full maturity.  We will harvest their pods to plant seed this fall with our cover crops.  And if the field peas were troopers, well, the Canada Thistle is an insurgent, and equally successful.  We'll shortly be chopping and pulling them up for, as CSU's Extension website states, "Persistence is imperative so the weed is continually stressed, forcing it to exhaust root nutrient stores and eventually die."  As if the weather wasn't stressful enough.  The two bushy-looking plants in the photo are our long-standing success: elderberries we planted in 2010.  One has more deer damage than the other, but both are doing very well. Time will tell how the Triangle project progresses.
The bees, the bees.  The bees are fantastic!  The weather that is kicking the tail of everything else is apparently just fine for our new colony.  In early May, you might recall, our friend and mentor Steve called us up to say our swarm was ready to pick up.  It was a biggish one, and he imagined it might give us some honey this year.  Each successive week I went through the hive, adding supers as time went by.  The first week of June showed a population boom as the first brood raised by the colony started hatching out.  The second week of May I had added the honey super, since the two brood boxes had almost all their comb drawn.  It was the second week of June before there was any amount of comb drawn in the honey super, but two weeks later that super was full of capped honey!  Wow!  Is this normal or not?  I don't know, but it was a great surprise to me.

  I added a second honey super then, but it has been so hot since that day that I haven't done anything more than take some water out to them and stagger their supers for better ventilation.  Maybe next week will get cool enough to check again.  Does this picture seem odd? The first evening I went out to look and saw them doing this I freaked out just a little. But a quick internet search brought up the term "bearding," which refers to the way they can hang on each other form the bottom.  Colonies do it in hot weather.  You understand, right?  Who wants to hang out in stuffy overcrowded house after working all day?

The yurt is still a mixed bag, but is quickly transitioning into livability.  A few of the finer points are the 1) leaky roof, 2) the loose rafters, and 3) the method of attaching the wall.  I wouldn't have seen issues past point one if it had not been for the extreme weather we got back at the end of June.  For any of you who lost power in that storm, you are familiar with the high winds that accompanied the relatively little rain.  It was enough to demonstrate that the yurt can withstand severe weather if it is sufficiently prepared (which it wasn't).
 For one thing, the rafters are all meant to be secured to the wall cable by means of a notch and screw, and to the center ring by a metal plate.  They all had the notch and screw, but I had not gotten metal plates for the new rafters I made.  When the high winds came, two rafters fell out of the center ring.  Now I know.

It also showed my method of attaching the wall to be faulty.  Since there were no instructions with the yurt, this point is a matter of my own creativity in problem solving.  It may be hard to picture, but try to imagine: along the top of the canvas wall there are two rows of grommets.  Who knows what Spirit Mountain Yurts envisioned - they have no comment.  So I used S-hooks to attached the top row of grommets to the cable atop the lattice wall (see photo above), and I laced a rope between the lower row of wall grommets and the grommets in the roof. When the wind came it pulled up the roof edge and knocked down many of the S-hooks, leaving great gaps for the rain to blow in.  So I guess it's a good thing we didn't get much rain then.

As to the leaky roof, I caulked it with silicone.  The rains today, gentle and soaking, showed that at least a few spots need better caulking.

 I look forward to sharing overwhelming success with you all as reports come in of weedless plots, gallons of honey, and comfortable, stable, lived in yurts!

14640

Sunday, July 8, 2012

Our Boy

Yesterday afternoon we asked Alten if he wanted to go get ice cream.  His body immediately stiffened, his eyes got wide, and he proclaimed:
 "I love that!  I reeeeeally love that!  Alten's tractor likes ice cream, too!"
This is the boy we swore we would never give processed sugar.  What happened?
 I think it's because Dad sneaked him that chocolate when he was ten months old...


14291

Monday, June 11, 2012

There's a Hole in the Yurt Roof, Dear Liza, Dear Liza

Anyone else know that song?
  As a follow-up to the euphoric yurt-raising post, I though I might take this opportunity to solicit ideas for patching holes in vinyl roofs.  There are plenty of products out there for vinyl seats, pools, and decorative Cadillac roofs, but none specifically for this kind of application.
  As you may have read, I did try a pool repair kit.  The recent rain showed it to be less than effective, and it was only a .2" drizzle.
  There are some other kits out there that may work, but I'd have to buy multiple sets for all the long holes and areas with lots of small holes. 
 Anyway, I would love to hear your creative, functional solutions.

Friday, June 8, 2012

At Long Last - The Yurt!

Those in the know are aware that we have desired to live over at the site ever since starting our garden project.  It would make everything easier - from watering, to scaring deer away, to getting little things done here and there at odd moments throughout the day.  All things that a distance of a half a mile makes either more difficult or impossible.  Many were the suggestions:  Get a cheap old trailer.  Fix up the house or the block garage.  Use a tent.  And all were good ideas, but we didn't have the energy to make them happen for one reason or another.

  Then we thought about our friends Brian and Luann (aka Yurtfolk), who have a beautiful and inspiring home in northern Indiana.  It's a 30' diameter yurt. We figured a yurt would fit into our lifestyle well as a seasonal home; we could put it up over at the garden, move in around April or May when the garden really starts picking up, then move back to the house in October or so when the weather turns cold.

  Dovetailing well into our plans, craigslist.org listed a place selling three used yurts in our area just days after we decided to actively search for one.  We took it as a sign, and followed up.

  The sellers had bought their yurts from Spirit Mountain Yurts a couple of years before, and they had all collapsed in a freak windstorm.  The company is not a good one, and if I had done a bit more research on SMY before buying ours second-hand I would have either talked the sellers way down or passed altogether.  We would have saved a lot of trouble that way, but it is likely that we've ended up with a passable yurt at a good price despite all the teeth-gnashing and replacing of parts I've had to do.
  The bottom line is this: the sellers sold us one of their 20' yurts, and were not exactly honest about the damage or the inventory of parts.  The lattice wall was broken in two, and the two pieces of wall didn't match up to make an entire 20' diameter.  It was missing 11 of the 30 rafters, the dome was seriously cracked, and there were holes in the roof vinyl.  Bedsides these points, the sellers did not pass us the packet of instructions on assembly, or answer any subsequent emails or phone calls.

  Spirit Mountain Yurts was not only unhelpful, but completely non-communicative. I found out (by testing a hunch) that they only respond to emails expressing interest in buying a yurt.  They have a very bad reputation across the board, it turns out.

  In spite of this I did attack the project with gusto, at least initially.  I decided to set up our new yurt inside one of our barns, so that weather would be no issue, and so that I could hang a pulley from a beam to help raise the yurt's roof.  I repaired the lattice wall, then secured it with the door in place.  When it came to lifting the compression ring in place, though, I found that one person with a pulley wasn't enough.  After a few attempts and some damaged materials (and morale), I threw in the towel for about ten months.

  Eventually Margo suggested that more hands might make it easier, and a party might make it more fun.  So I held a gathering of men from the Dayton Mennonite Fellowship that we attend, and victory was achieved.  It turned out that putting up the roof, manufacturing the remaining 11 rafters, and pulling out and checking the canvas wall and vinyl roof was a simple and light-hearted task for 12 people.  There was a great deal of joking around the image of me trying to do it all myself.


 I was finally convinced that this yurt might be a good idea after all, so we went ahead and planned a date for the yurt-raising.  In the few days prior to that we would build a platform for it to sit on and patch the roof as well as we could.


  It is at this point that I'd like to plug a company with an appropriately stellar reputation. Pacific Yurts designs and builds exceptionally strong, durable, and versatile structures.  What's more, they have plenty of helpful information on their website, and they answer phone calls and emails.  And, to top it off, they give detailed specifications and instructions on building platforms for yurts of various dimensions, which was especially helpful.  A stark contrast to Spirit Mountain Yurts.

  After gathering the materials Margo's dad and I went through the excruciating process of leveling the 16 concrete piers, put up and leveled the beams, and then screwed down the deck.  The platform took two days, and overlapped with what was supposed to be the actual yurt-raising.  Our friend Knoll came over to help finish the decking and drip-edge that Saturday, and by the time we called it quits that night the three of us had put up the lattice wall, the door, and the rafters and compression ring.

  Knoll came back over the following Monday to help me muddle through the installation of the canvas wall, vinyl roof, and dome.  This was one step that filled me with trepidation, because I had no idea how it would all fit together.  The grommets on the wall canvas looked nothing like the descriptions any other yurt companies gave in their own assembly instructions, and Spirit Mountain Yurts remained, of course, eerily silent.  But we succeeded against all odds, and the first rain showed it to be mostly water-proof (my roof patching was not quite thorough enough).

  So now we are yurt dwellers!  At least, we will be when we move in next week.  We have already spent a good deal of daytime in it between garden tasks, and Alten can vouch for its excellent nappability. 

  There is a long list of people who made this yurt possible - Chris W.,  Zach, Ben, Brian, Jeff, Kevin, Kevin's dad, Tim, Mike, Jason, Dave, and Will all lent a hand in the barn putting up rafters and giving me a strong dose of optimism and creativity.  Chris R. helped out caulking the drip-edge plywood and persuading it into place.  And without Rex and Knoll, to whom I give endless thanks, the platform and raising would have taken three weeks instead of three days. That is no exaggeration.  Margo gets credit for keeping the thing on track, and Alten gets credit for looking cute all the time.

13400


Tuesday, May 15, 2012

The Buzz

Whew!  Has it already been a month and a half?  Please excuse my delinquency, and take my word for it that we've been busy.  Hopefully I'll get the chance to post about a number of our April adventures.

  But for now, our new livestock: A few thousand head of bees!

I'm the kind of guy who does not jump right into an activity with both feet.  I read about it, I ask questions, I watch, and then I hesitate.  Beekeeping has been on my "I think it would be so cool to do that" list for years, but it took a confluence of events to finally get me past the hesitation phase.

  Step one was that my sister and brother-in-law got an IOU wedding present for a bee hive, and didn't foresee themselves keeping bees any time soon.  They offered it to us, and I enthusiastically accepted.

  Step two was that a farming friend and mentor down the road, Steve, keeps a few colonies and encourages anyone interested to start keeping bees.  He told me the best time to start was right now (that was three years ago), and that he'd give me a swarm.

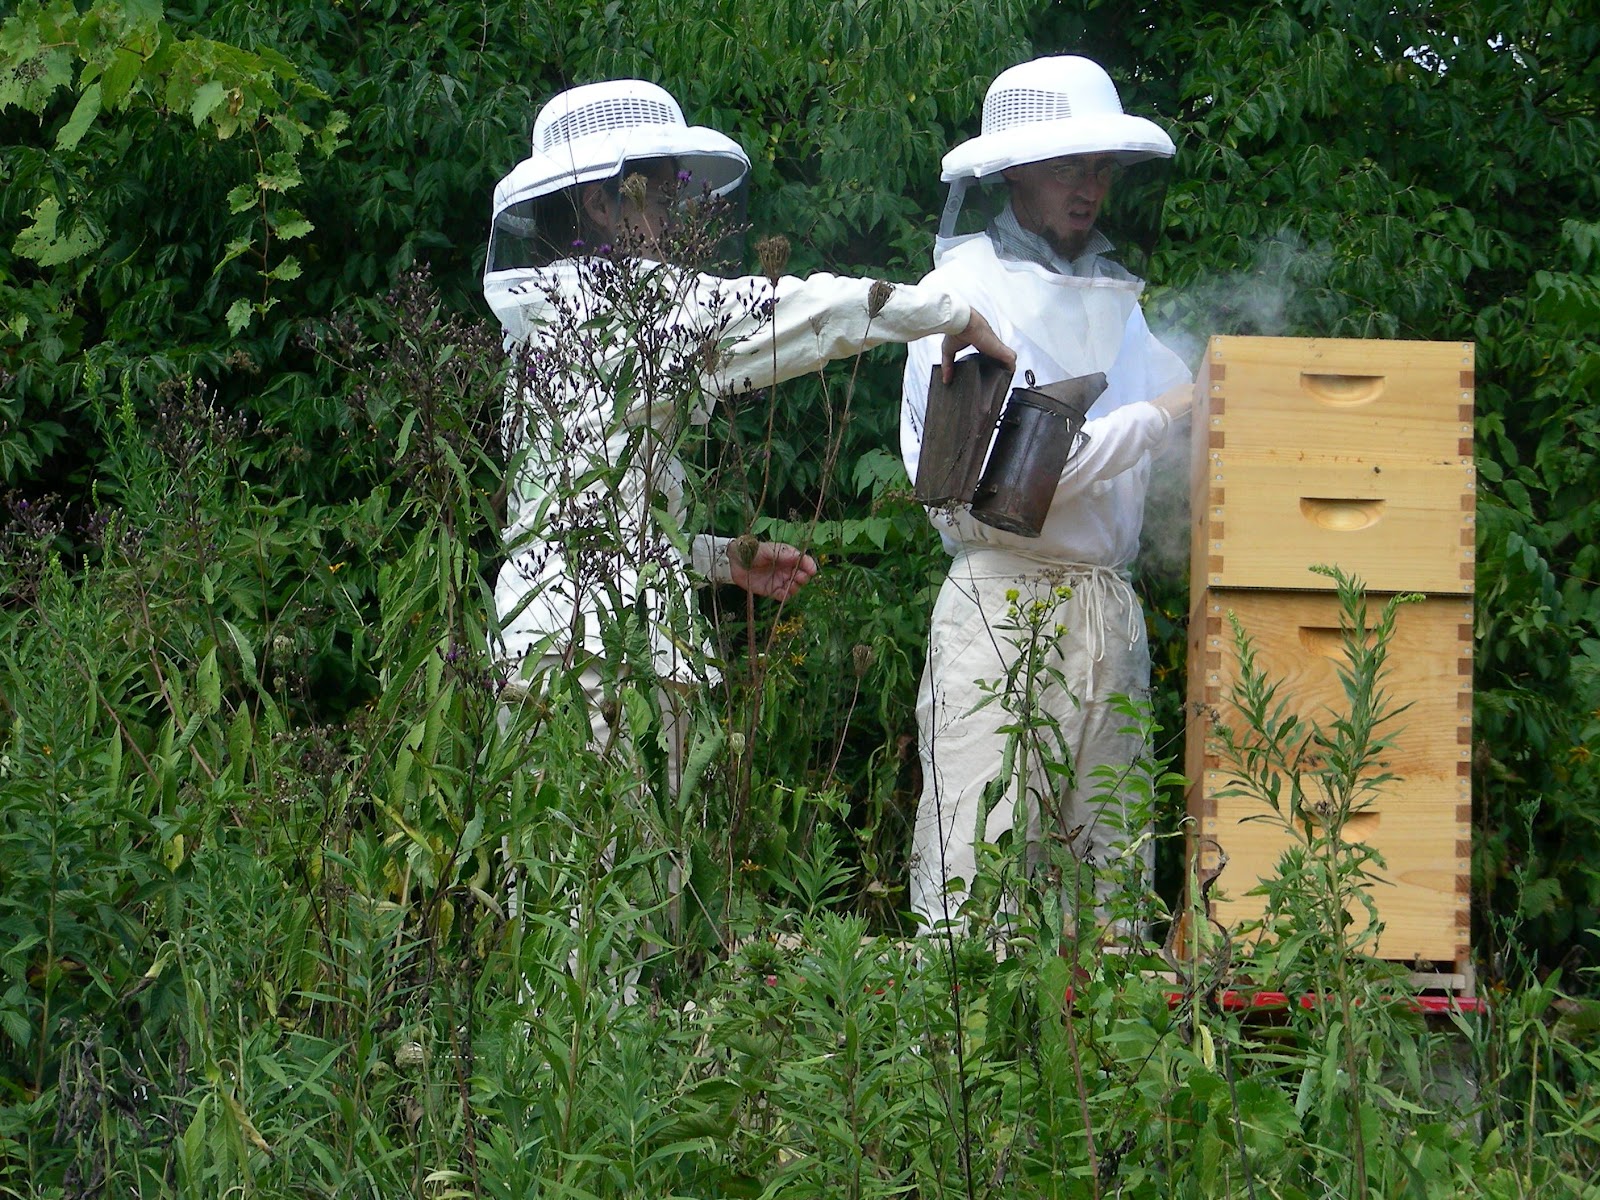
  Step three happened last spring, when he invited me over to go through his hives with him on the first warm enough day of the year.  This was the closest I could get to going on a beekeeping test drive, and I was pleased with the results.  As someone who got stung a number of times as a child, I was unsure whether or not I could handle (literally) managing and eventually robbing thousands of stinging insects.  And Steve encouraged me to follow his example, going without gloves.  It was a great experience, and reassured me in a way the books couldn't that they aren't out to get you most of the time, even if you are messing around with their home in a very invasive way.

  Steps four through, say, twenty, involved ordering equipment, searching thrift shops for some likely white pants and shirts, preparing equipment, re-reading all the books I'd read, finding new online resources, and readying the bees' area.

  Finally, I waited eagerly by the phone for a few weeks for Steve's call that the bees had swarmed. When that happened I woke up eeeearly the next morning, went to pick them up, and drove a gently buzzing box home in the back of the car.  In the photo at left you can see them coming out of their new hive for the first time.  It was quite cold, so they were tentative. At that point I had begun keeping bees and, though I hadn't done anything to or with them yet, I was quite excited, proud, and content.

  It's only gotten better since then, too.  Here are some of the details:


  The original gift was a bottom-board, inner-cover and telescoping outer-cover, and one hive body with frames.  They came from Brushy Mountain Bee Farm, and since equipment can vary between companies it is conventional wisdom that one use components from the same one.  (Since ordering from them I have received four identical catalogs at different points - a subtle hint that they'd like me to get others hooked on their product).  So I went back to Brushy Mountain to get the rest of the equipment I'd need, since one hive body isn't enough.

  Mine is an 8-frame hive as opposed to 10-frame, which describes how many frames each super holds.  This, too, was a decision made by the giver of the gift.  Since it's good to be able to interchange equipment between your hives, any hives I get in the near future will likely be 8-frame as well.  That's fine, though.  An 8-frame super is, of course, easier to lift than a 10-frame super.

  You can finish the exteriors of your hives with many coatings, or even no coating at all.  I went with linseed oil, because I like the idea of some weather protection, but would prefer a more natural choice (in look and ingredients) than paint.  And, of course, they do look beautiful.  The photo at top right shows three finished supers, three without coating, one that hasn't been assembled, and a couple of empty frames.

  The spot I settled on for placement was our prairie, because it is as far as I can get from any chemically-cultivated field.  There's disagreement on the cause behind colony-collapse disorder, but the presence of chemical pesticides, not to mention herbicides and fungicides, can't have a positive effect on colony health.  And the genetically modified corn plants engineered to produce the soil-borne insecticidal bacteria BT do manufacture it in every cell of their structure, including the pollen grains.  When bees collect these (and, believe it or not, they do visit corn tassels) to take back to the hive as food for brood-raising, there are negative consequences.

  I've visited the hive and opened it up twice since taking ownership, and am becoming more comfortable bit by bit (that's me at right).  That's not to say that I haven't come up with perplexing questions from each observation, but I take comfort in knowing that there is a great deal to learn.  I might as well start now!

  I'm also lucky to have the beekeeping contacts that I have.  I already knew I had a few friends and relatives with experience, but since embarking on this adventure I've come across multitudes of others who are either recent beginners or old hands.  It is reassuring that at every turn I seem to find some great knowledge and ideas.

  So here's to home-grown honey and wax, heaps of pollinators, and the great humming unknown!

12750 

Wednesday, March 28, 2012

Rockin' the Triangle

On Saturday we held our first volunteer workday in 2012!

The target was a little 900 ft corner of a conventionally-farmed field directly to the east of our garden. We carved it out of the the rest in 2010 with plans to expand in that direction as needed. (At right is the google-eye view).

The farmer who leases the fields on the property is a great guy, very amiable and knowledgeable about chemical farming, and curious about what it is we're doing. So when we asked if we could take a titch of the field for our own uses he told us to mark out whatever we wanted, and that it wouldn't be a problem. That was April of 2010, about a month before he would spray and put in soybeans.

Two months later we had a real appreciation for what round-up and whatever else he sprays is capable of doing. Except for a few resistant (or persistent) weeds, the field was devoid of anything but soybeans. Our triangle, however, had erupted in every weed whose seed had ever landed there, and had jumped to a height of 5+ feet. It was almost funny. But there were some serious thistles and heavy-duty dock plants, besides the sheer mass. Over the past two years we laid down cardboard and chicken feed bags across the whole thing, then put branches and whatnot to keep them down, all in the interests of preventing any more weed insurrections. We also put in two Elderberry bushes, which are native here.

Since we are beginning to get a handle on our Biointensive garden, we have started setting goals and taking steps toward management of the rest of the land, including the ~4.5 acre field to the East and the ~7 acre field to the West. We won't be able to put cardboard, chicken feed bags, and windfall branches on all of that, and so we've been brainstorming what is possible. Every pass of the chemical sprayer makes our next move feel more urgent. While we've toyed with using a disc for our little Ford 2000, the current state of the soil means any cultivation at all will contribute significantly to the erosion already taking place.

So we decided on the strategy of broadcasting grains and legumes in a Fukuoka-style kind of way. For those unfamiliar with Masanobu Fukuoka, I recommend his book One Straw Revolution. Essentially, over the course of decades, Fukuoka developed a technique of growing grains that meant he walked his fields only five times a year - once to broadcast seed, once to harvest barley and again to spread its straw, and once to harvest rice and again to spread its straw. The result was a constant returning of biomass to the fields, with little compaction and no disturbance of the soil other than root action. The straw also cut down on evaporation and weed growth.

In our case, we broadcast wheat and field pea seeds and mulched them with grass clippings (experimenting with technique at left), in the hope that we can cover the soil with something that will cut down on weed growth, build the soil through root action, and possibly give us food in addition to straw. We will see what we can to to develop a Fukuoka process for ourselves.

For a mere 900 ft, not all that much work is involved, unless you take into consideration the cardboard and paper that were covering the soil, and the branches piled willy-nilly all over the place. It would have taken us a couple of days to make the transition happen. So we sent out a general email to friends all over the place, and invited them out for a work day. In the end we had four friends stop on their way home from Pennsylvania to northern Indiana, four friends from much closer to home, and my brother. Many thanks to Brian, Chris, Harley, Luann, Miriam, Owen, Tracy, Will, and Zach!

We pulled up paper, piled up wood, sickled and raked grass, broadcast seed and clippings, had a fire, and ate good food before we called it a night. It took less than two hours, though, to complete the task at hand.


As usual, we count it a great blessing to have the community we do. Many hands make light work, as they say, and so we try to trade around who gets the benefit of that. In the next few years I think it will often be us, though, since the land work we need to do doesn't involve any particular skill or training. A simple willingness to get dirty, and be able to laugh while you're doing it, is enough.

Our next work days will be tree planting and path building.

11425

Wednesday, February 29, 2012

OEFFA Conference and Earthineer

A big part of settling in a new place is gathering a community for support, encouragement, and inspiration. For agriculturalists, or agrarians, that community is especially important. It means the difference between floundering on one's own and flourishing with others. While we knew a number of farmers in our area before and soon after alighting here, we soon learned that Ohio has an extended and ready-made network of organic (and beyond-organic) growers, marketers, and activists. It is OEFFA, the Ohio Ecological Food and Farming Association.

To learn all about what OEFFA does you can look at their "About OEFFA" page. In a nutshell, though, they are an organic certification agency, an education and support network for farmers throughout Ohio and the US (there are many members outside Ohio), and a well-organized advocate for farmers and consumers in the realm of state and national legislation. They publish a newsletter, hold farm tours and workshops across the state, and have a bumpin' annual conference featuring far too many workshops to choose from, inspiring top-notch keynote presenters, a trade show, meals from local and organic sources, and an opportunity to meet peers face-to-face.

Last year Margo went with Alten, had a great time, and made useful connections. This year it was my turn. I rode with a friend, Ben, who farms nearby at Mile Creek Farm, and that ride gave us an opportunity seldom afforded to folks in our situation (farmers with young children) to sit and have a focused conversation for hours. Soon after arriving at the site he introduced me to friends of his from our area, among them Doug and Kat of Smaller Footprint Farm and Isaac, the Food Service Coordinator at Antioch College.

I attended workshops on food preservation, defining one's vision, NRCS funding opportunities, using mushrooms in your woods and garden, companion planting, creating and maintaining native gardens to capture rainfall runoff, and what to do when you've got lead in your soil. I would have loved to attend the workshops on moving old barns, the risks of "fracking", cultivating edible mushrooms on logs, raising and selling fiber, and a number of others. I attended Woody Tasch's keynote on the Slow Money investment movement and Andrew Kimbrell's on the progress being made to keep Monsanto's (and others') aggression towards small farmers at bay.

Then, of course, there was the Saturday evening contra dance, which needs no explanation to those who know contra dancing, and of which no explanation of mine can do justice for those of you who aren't familiar with the past-time. Suffice it to say, I think you should try it if you never have before.


I did come out of the OEFFA conference with one more potential internet habit. The one booth in the trade show that I could not resist was that with the two computers, a large flat panel tv, and a flashy red GrainMaker mill. It was the display for a new social networking site, Earthineer. The two founders, Dan and Leah, were there making their pitch, which was this: Facebook is all well and good, but for those of us who are pursuing a sustainable lifstyle a world-wide community could be an incredible asset. For any question that one might have, many are steps away from the same problem and many have already found various wonderful, creative solutions they want to share. That's the gist of it, anyway.

Leah and Dan's background is similar to many of the rest of us: they had a formative experience that sat with them for a while, and when a transition came in their lives they made some big changes based on the vision that experience left them with, and Earthineer.com is the product of those changes. I can identify with those motivations, and knowing that two of my favorite companies (GrainMaker and Countryside & Small Stock Journal) support the project makes it even more appealing. How useful I find it remains to be seen. I don't really understand how Facebook works, and for all my blogging the internet still leaves me, ironically, feeling dazed and disconnected. But I expect, as the Earthineer community grows, that I am going to find conversation and answers through a single website which would previously have taken me days of searching and many wild-goose-chases to find otherwise.

So if you have the inclination, join Earthineer and be my friend. 'Cause I only have two right now, and one was the default.
10550

Thursday, February 16, 2012

The Haiku Game

We go for the cheap thrills. When we are looking for entertainment, we don't go to the cinema, the races, or skiing in the Alps. Usually not even to the bowling alley. We're game-playing people. There may be later posts dedicated to Settlers, Ticket to Ride, St. Petersburg, Scrabble, Chinese checkers, and the host of other games we love to play, but this one will sing the praises of The Haiku Game.

Haiku, as you may have learned in elementary school, is a form of poetry from the Japanese culture. It is the simplest kind I know in terms of rules, classically consisting of three lines with a reference to the natural world. The first line holds 5 syllables, the second holds 7, and the third concludes with 5 more. That's a simplified and strict definition - modern forms infrequently stick to the 17 syllables or images of nature. For example, here's one I wrote in the back of class during the poetry unit in my Elementary Education courses:

Half of my classmates
Talk too much, saying nothing.
The other half doze...

More recently we spent four years in Willits just a few miles up the 101 from Ukiah, which holds a grand Haiku festival every year. They take it pretty seriously, with judges, awards, and submissions from around the world.

Enough with the background. Now for the game. I have, sadly, not been able to figure out from whom we learned it initially; none of the people present the first time I recall playing it even remember the occasion. But since learning we have introduced it to many friends and acquaintances. It goes like this:

Each person sits with a piece of paper and writing utensil in front of them. Each person writes the first line of a haiku (5 syllables) and passes the paper to their right. Each person then takes the paper passed from their left, and writes the second line of haiku (7 syllables) to match the first line in front of them, and passes the paper to the right once more. On the sheet now in front of each person, they write the final line (5 syllables) to complete the poem, and pass it to the right once more. When all poems are complete, each persons takes a turn reading the haiku that the three people to their left wrote.

Depending on the group and the time of day, poems can be entertaining, deep, foolish, or completely unintelligible. And if the young (or syllablically-challenged) are participating, the 5-7-5 rule might end up as more of a suggestion. But it remains good wholesome fun, encourages community, and creates art.

So in honor of the past participants of Haiku Games that Margo and I have facilitated, and in honor of the 10,000-view-mark that the blog passed recently, I am instituting a "Haiku of the Week" to be featured in the sidebar. Each one will be taken from the sheets of Haiku Games past that I've kept.

Happy reading!
10090

Wednesday, February 8, 2012

How to Grow More Vegetables, 8th Edition

How to Grow More Vegetables, by John Jeavons, was initially published in 1974 by John and Ecology Action with the help of copying machines. While that happened before I was even born, I have heard the claim substantiated by folks who bought the first edition long ago, and 35 years later made it to their first tour of Ecology Action's gardens. A few editions down the line it was picked up by Ten Speed Press, of Berkeley, which also publishes a number of other great books (and which has been recently bought by Random House).

It became thicker, edition by edition, as EA's work progressed and the concept of biointensive, and then GROW BIOINTENSIVE, mini-farming was further developed. And, as those of us who have owned recent copies know, it contained nearly sixty pages at the back known as The Bibliography that listed thousands of resources that pertained to sustainability, agriculture, simple living, solar cooking, and the like.

When Margo and I began our agricultural life we had the 6th edition, and soon after coming to EA the 7th edition was published.

Some folks, depending on their philosophy of sustainability, count it as the Bible of sustainable agriculture. We found it as a combination of three sections: a great introduction to principles of successful gardening (in general) and biointensive gardening (specifically), a constant reference for crop-specific flatting, transplanting, and diet information, and a collection of sample garden plans modeling true sustainability.

The first section, once read and understood, I seldom returned to except as a teaching aid. After practicing it the information has been internalized. The second section is known, infamously to some, as the Master Charts. Before attending a workshop at EA they were a mystery of numbers and lists, and now they are a constant companion in our planning. I never took much time with the third section, because it came across as too technical, and I didn't have the attention span for that kind of reading.

For the Master Charts, though, our book has accompanied us everywhere from dining room table to garden bed, California to North Carolina.

The 8th Edition has been published and is now on sale. Small and medium changes have been made throughout, with three large ones I've noticed so far: the technical "sample garden plan" section I talked about above has been boiled down from 20 pages in the earlier edition to 9 pages in the new one, and presents itself in a more approachable way. The Bibliography has been cut out entirely, and is now available online at EA's website on this page. In its place is a list of helpful tools and plans on how to build them. And, most pertinent in our long-term use of the book, the Master Charts have undergone a transformation. In previous editions each set of 20 crops would span four pages, requiring the planner to flip back and forth to get all the information. In the new edition crops are in sets of 10, and span two facing pages. Those who own a copy and have used the Master Charts will know what I mean; it will require some adjustment for us, but will likely be a big improvement.


In other news, we have flatted our alfalfa, clover, onions, and leeks, and will flat our green onions next week. Our pseudo-greenhouse has maintained temperatures above freezing for the last few weeks, which is good. I finished processing the last of our crops from 2011 and now have the yields for all of them calculated and logged, and plan to add a page to the blog that lists our high yields. So our sights are set on 2012 now, with EA's March Three-Day Workshop in Willits coming right up, classes at our local Audubon center on seedling propagation, compost, and bed preparation soon after, and then planting!

Winter, for all practical purposes, seems to be over...
9825

Monday, January 30, 2012

Garden Report 2011

Every winter we crunch our numbers and do a write-up that summarizes the garden's experience and progress in the past year. (Our 2010 report was posted January 13, 2011.)

Circle of the Sun’s 2011 growing season was a welcome contrast to 2010. We got sufficient rainfall for most crops, welcomed two interns from Kenya for three months (see the November 2011 issue), brought almost the entire 4,200 square feet into cultivation, built enough compost piles to meet our bed amendment and flat soil needs, and started expanding into the corner of the neighboring field.

We noticed a big difference in soil structure this year, in terms of ease of digging, between beds that were dug last year and those dug for the first time this year. We expect the 2012 addition of compost (at the rate of one 5-gallon-bucket per 100 sq ft) will also be a big help to the soil, both in terms of drainage and ease of working. We also found that, despite the heavy rains we had early in the season, our garden drained much better than the surrounding area. Our conclusion, then, is that double-digging alone is quite helpful to a heavy clay garden simply through the creation of pore space, which benefited the root systems of our crops in addition to the advantages already listed. And now, thanks to the “jar test” method, we can give an objective description of our heavy clay soil. During the internship each of us chose a spot in the garden, took a sample, and ran the jar test. The outcome ranged between 73% and 84% clay, 15% and 26% sand, and no silt registering whatsoever. That’s what they call “heavy clay”.

Weather was much more pleasant than last year regarding rainfall, erring slightly on the side of too much. We received 58.35” of rain in 2011. Readers may remember that we put our rain gauge out in 2010 mid-April, so we can’t compare last year’s reading directly with this year’s. But taking that into account, between April 15 and December 31 of 2010 we received 22”, compared with 45.75” for the same span in 2011. Wow! The National Weather Service states our average annual rainfall as 39.58”, so our reading this year registers as nearly 20” above average. Most of that rain came at convenient times, filling our rain barrels just as they became empty. And our crops were grateful for the regular water, giving us generally much better yields than in 2010.

Our temperatures were not notable, with the exception of two-and-a-half weeks in July when the highs stuck in the upper 90’s (a nasty shock to our interns Peris and Mary, who had just arrived from a more moderate climate). It was hot enough that beans had trouble pollinating, and the price of green beans doubled. We were glad, when we asked around, that we weren’t the only ones suffering from that problem! Our highest temperature of 2011 was 102° F in August, our lowest was -16° F in January. Last frost was 30° F on May 5, and our first frost was a hard one, 25° F on October 22.

Our season got off to a great start with timely flatting, thanks to an early spring project. With scavenged lumber and used windows from other people’s renovations, we framed out the south-facing garage door in an out-building and covered it in glazing. As a result, we had a place to put our seedlings that got good sun and never fell below freezing.

Our tally of crops this year looks much better than last year. I’ll start with our two big successes: kale (at left), and sorghum, which also did well last year. Our kale yield astounded us - our 20 ft² area gave us a total of 34.78 lb in its six-month life. That works out to 173.9 lb/100 ft², which is well over the Grow Biointensive high yield! With sorghum we exceeded the intermediate yield again for air-dry biomass, with 52.03 lb/100 ft², and raised the seed yield from last year’s 7.43 lb/100 ft² up to 12.8 lb/100 ft², halfway in between beginning and intermediate yields. Sweet potatoes also performed much better for us this year, the best section of which produced at the rate of 101.9 lb/100 ft². That puts it slightly higher than beginning yield, but more notable yet is that it marks the first time we have successfully grown sweet potatoes bigger around than our thumbs (some this year exceeded 1lb in weight). Also worth mentioning is that the most successful of our varieties came from a friend whose family has been cultivating it locally for over 100 years. That’s acclimatization.

Our other root crops - potatoes, carrots, onions and parsnips among them - continue to have difficulty thriving in our heavy soils, though we expect they will perform better as we add compost.

Cereal grains were a mixed bag in 2011. We grew out seeds from Bountiful Gardens’ rare-seed collection of barley and spring wheat, planting 4 ft² sections of each variety. While some sections only amounted to 7 or 8 plants, we managed to bring all of them to maturity and end up with 3 or 4 times the number of seed we started with. Our winter wheat and rye were a disappointment, maturing to give us well under beginning yields for both seed and biomass, and we attribute that to last year’s drought. We were not able to dig or transplant due to the hard dry soil in October and ended up broadcasting the seed, doing our best to chop it in with a rake.

Many experiments in the garden are devised as a matter of circumstance, and so it was that we decided to do a test comparing transplanted vs. broadcast flax and parsnips. Transplanting the entire sections of each would have required more flats than we had built, so we transplanted half of each crop and broadcast the other half. The results were noteworthy - poor germination and difficulty weeding their random spacing meant total failure of both broadcast sections, while the transplanted sections flourished. It may be worth doing the same comparison each year, simply for the dramatic visual during garden tours.

As part of the Grow Biointensive method we grow open-pollinated varieties of our crops, and put some energy into saving seed from year to year. With beans and wheat that is a simple matter, since the same thing we are saving to eat is what we will plant. Other crops are a little more complicated, but worth the effort for the satisfaction. This year, in addition to the crops whose seeds we eat, we saved from our lettuce, tomatoes, basil and squash plants, and from last year’s parsnips and parsley (at right) which, as biennials, had to survive winter to produce seed. Additionally, we went to great lengths to save seed from two varieties of flour corn. Corn crosses very easily, and our garden had GM corn planted within 20 feet of it this year, so we practiced our hand-pollinating skills and taught Mary and Peris how as well.

I’ll wrap up with one of the highlights of the growing season, which was our first garden tour. We intend to make it an annual event, open to the public, but tested the waters this year by inviting all of our friends and family. Over 50 people came to share food, get guided tours of the garden, hear our vision for the farm, and play in the sun. We look forward to an annual event that showcases the potential for small-scale sustainable agriculture to feed households and neighborhoods in our community.

Many thanks to all who helped to make this season a success for Circle of the Sun through organizing and funding the internship, hosting and supporting interns, coming over to work with us, and giving us advice and encouragement.

Time to set our sights on 2012!
9610

Monday, January 16, 2012

The Perfect Shoes

I've had many different styles of shoes that I can recall in the past couple of decades. I really started caring in middle school and dove in full-tilt with L.A. Gear high-tops, using the two sets of six-foot-long laces per shoe they provided (in lieu of a photo of my shoes, this one is a good example of their version for girls). Then I moved on to Nike Air, retaining my preference for fluorescent colors with successive generations of the Agassi (at left), named for the tennis star.
But pretty soon, and before I finished high-school (though I'd have to consult my yearly photos), I moved on to Adidas Sambas. I'm not sure why, since they are about as far as I could get from my previous choices and still be in the mass-produced mainstream sportish shoe market (they're number two in this blog's list of "Four Essential Pairs of Shoes and Casual Trainers"). But I think I was growing into myself more, wanting less attention and more simplicity. These shoes have been made in the same style since the 50's - they're just black and white, have a half-inch or so of sole, are relatively cheap, and last for a good while. I would milk them for two years before they would be worn through, then I'd buy another pair. I had at least three, maybe four pairs.

Once I got a pair of Adidas' Campus shoes, which were similar in design but were suede. They tore through the toe within a month, but the store wouldn't take them back. So after I wore them long enough to feel like I'd got my money's worth I went back to the Sambas. Ironically, the defective Campus pair got a much longer second life as garden shoes after I cut the toe and heel off - as seen in EA's harvesting and threshing video at a little past the five-minute mark - nice!

During our first year at EA I got frustrated with the idea that, once my shoes were really shot, they would have to go into the trash. I decided that, from then on, I was going to buy shoes that were made of natural materials (as much as possible), looking specifically for hemp or leather. We went out to the town of Mendocino and visited a store called Mendo Twist where they specialized in "natural" things, and I settled on a pair of La Fuma shoes with hemp uppers and natural rubber soles (at right, threshing). They were on discount. While I believe in the relative strength of hemp, these shoes were not a great example. They wore through, unraveled, and shredded within a year, so I took them back and traded them in for a pair of leather Patagonias. The soles were synthetic, but Patagonia is well known for good sourcing and good treatment of their workers and the environment so I went with them anyway.

They were also more expensive, but in the years since college I have realized that cheap in the short-run can easily be pricey in the long-run. If I pay $35 for a pair of shoes, that seems great. But if they only last one year through my hard labor, I am better off buying the $80 shoes (which is what the Patagonias cost) if they are going to last 4-5 years, which they did. Then they end up costing $16-20 a year, and I save $60 or more over their life by investing up front. But like all things, they do eventually wear out, and these particular shoes were not made to be re-soled. So this fall, after stepping in puddles only to wick water through the holes in the bottom of the shoes into my socks, I started looking again.

Now I was ready to make a bigger step, beyond generally simple, natural, and environmentally thoughtful. I wanted to find something endlessly repairable and completely natural. Repairable, so the shoe doesn't need to be discarded when the sole finally wears through, and natural so that, if it ever does fall completely to pieces, it will break down and not need to be stored till the end of time in a landfill. If a shoe is natural and repairable, I came to believe that it must be leather. Achieving this conclusion, I realized I was going to need to look for the shoes they made "back in the day," when my current criteria were the only way it was done anyway.

I dug up two options. The first were modeled by a friend who does livestock on an 1880's-era working farm north of Dayton, the Carriage Hill Metropark. His shoes, he confessed, are actually the style of the 1860's, which are reproduced in large quantities for Civil War reenactment. They were Brogans, made of leather stitched together with wooden pegs to hold the soles on. Very cool looking, and very durable. He got his from C & D Jarnagin Company, if you want to see the goods.

The second were moccasins, in the general style of any native American culture. I ran into a friend who had gotten a simple pair from Minnetonka Moccasins, and she used them sock-less in all weather to great effect. The advantage of moccasin over brogans is that you can feel the ground underneath you. Alternatively, you can't do digging in them, because the shoulder of the shovel won't feel so good on your foot.

To make a long story - a few months of hemming and hawing, then another month of deciding where to get them - somewhat shorter, I decided on the moccasins. I have some old hiking boots I can use for digging. I went with the Arrow Moccasin Company and got a pair of lace boots with a double sole (at left on my feet, and at right on Alten's). They are expensive to me (having never "invested" in those $170 Nike Air Force 180 Pumps back in 1992) but they will last years before the sole wears through, and then the sole can be replaced.

Being leather, there is a little break-in time required. For the first 10 hours or so these were the most painful thing I have voluntarily done to my feet, short of removing splinters. Since then they have become the most comfortable shoes I've ever owned, and they are not even fully broken-in yet.

Of course, I intend to wear them while working, playing, and walking through mud, but like any new shoe I will be treating them very nicely till they get the first scratch. You will see them on my feet in many photos to come!

9000