 And dry.
Ok, so it's not saying much to note that this is the hottest summer since we've been keeping track, but we have had some hot weeks. The area farmers we've talked to attest to the fact that, though the season started out very promising, this has been one of the driest mid and late seasons they've had. Since their corn loved the heat and was able to cope with the lack of rain it doesn't look too bad. But the soybeans committed to many pods full of peas, which then didn't have the resources to develop into an ideal size. So while they are worth being harvested, they're disappointingly small.
The man who farms the land surrounding our garden also grows for the local farmer's market. When he's by looking at the fields we chat by the garden in that uniquely farmer-ish way. He said it has been a terrible year for produce, and most of the other market-gardeners he's talked to say the same. We had been feeling disappointed by the lack of time we had to give our garden this Spring and Summer, but he made us feel a little better by laughing and saying "You sure picked a year to start out! Whew!"
But of of course, what is talk without numbers?
First the temperatures:
Between April 16 (when we put up our rain gauge) and the end of June we received 12" of rain, on the dot. Then the tide turned. July totaled 2.45", and early August rains totaled .55". We haven't gotten more than a hundredth of an inch since then, and that is too little for our gauge (or our soil) to register. Luckily, our rain barrels are attached to a roof so large that a hundredth of an inch can fill them up. So we've made the 110 gallons of stored rainwater last the two weeks or so between brief spates of precipitation.
Rain would be good for the crops, but it is absolutely necessary for bed preparation. Our soil is quite clayey and severely lacking in organic matter. The best time to dig has been two days after a good rain of between .5" and 1.5". Earlier is too muddy, later is too dry and brick-like. What happens, then, when you haven't had any rain of note for a month and a half? Well, you water the soil heavily if you have water. If not, you hope it rains before you need to put in Fall crops.But of of course, what is talk without numbers?
First the temperatures:
Our last hard frost was the 28th of April, and our last light frost came May 10. It didn't reach 80 ° F in the garden until May 23rd, but that may have been a fluke.
Before I go any further, I have to explain our thermometer placement. When we first set it up there were no fenceposts, so we used a huge ornamental pear tree directly north of the garden. I was a little paranoid, I admit, that someone would steal our precious min/max thermometer, so it was buried thick in the foliage. We realized by July that the placement was seriously affecting our high temperatures, so we moved it to a box on a prominent fencepost on the 26th of that month. So all I can talk about before that point are trends, that one week was hot and another one cool.
Which is, really, what happened to screw up a lot of the serious market gardeners. For instance, the week after Alten was born the highs were in the mid-70's. The week after they were in the the mid 90's. Ensuing weeks were in the 90's, then low 80's, then up to the high 90's, then low 80's or high 70's. And, of course, you don't remember the cool reprieves. The hottest it got for us was 100° F, on August 13. I wish we had a humidity gauge, because I think those numbers would really impress you all.
The daily low temperatures are as interesting as the highs, maybe more so. Back at Ecology Action we talked a lot (covetously, mostly) about the optimal growing range for plants in general, which is 60° F to 95° F. Below 60° F most plants slow down their processes, and above 95° F as well. At the research farm and at the Golden Rule garden summer days would not uncommonly top 95°, and summer nights would rarely stay above 60°. It's a pretty big handicap to have your plants shutting down twice in a 24 hour cycle. So we would keep track of the number of nights in a summer that stayed above 60°. The first summer we were there was very hot, and yielded 16 nights above 60°. The next summer there were none.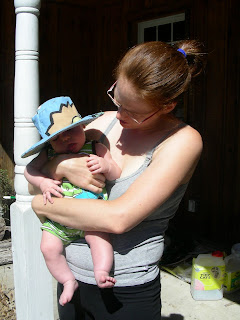
This place is a different story. Tomatoes seem to gain a foot and a half overnight, and if you sleep outside you can hear the corn growing. June through August gave us 74 nights above 60°, 13 of which were above 70°. Which is only good for plants, being a little warm for the farmers.
And since Alten is going to be working in that sun and heat with us, I made him a little sun-hat for his own...
Now rainfall:Which is, really, what happened to screw up a lot of the serious market gardeners. For instance, the week after Alten was born the highs were in the mid-70's. The week after they were in the the mid 90's. Ensuing weeks were in the 90's, then low 80's, then up to the high 90's, then low 80's or high 70's. And, of course, you don't remember the cool reprieves. The hottest it got for us was 100° F, on August 13. I wish we had a humidity gauge, because I think those numbers would really impress you all.
The daily low temperatures are as interesting as the highs, maybe more so. Back at Ecology Action we talked a lot (covetously, mostly) about the optimal growing range for plants in general, which is 60° F to 95° F. Below 60° F most plants slow down their processes, and above 95° F as well. At the research farm and at the Golden Rule garden summer days would not uncommonly top 95°, and summer nights would rarely stay above 60°. It's a pretty big handicap to have your plants shutting down twice in a 24 hour cycle. So we would keep track of the number of nights in a summer that stayed above 60°. The first summer we were there was very hot, and yielded 16 nights above 60°. The next summer there were none.

This place is a different story. Tomatoes seem to gain a foot and a half overnight, and if you sleep outside you can hear the corn growing. June through August gave us 74 nights above 60°, 13 of which were above 70°. Which is only good for plants, being a little warm for the farmers.
And since Alten is going to be working in that sun and heat with us, I made him a little sun-hat for his own...
Between April 16 (when we put up our rain gauge) and the end of June we received 12" of rain, on the dot. Then the tide turned. July totaled 2.45", and early August rains totaled .55". We haven't gotten more than a hundredth of an inch since then, and that is too little for our gauge (or our soil) to register. Luckily, our rain barrels are attached to a roof so large that a hundredth of an inch can fill them up. So we've made the 110 gallons of stored rainwater last the two weeks or so between brief spates of precipitation.
The good news is that yesterday we acquired four new 55 gallon drums from our local soda pop distribution facility, which will triple our capacity for storage.
Of course, they won't do any good without some rain...


